ShortPixel Image Optimizer Review – Best WordPress Image Compression Plugin
Slow loading images affect and eat up your website performance.
But they are also a necessity as they create and boost user engagement, so it’s not possible to ignore them either.
Therefore, to maintain the quality of images and website performance at the same time, you need to perform image optimization.
And the easiest way to optimize and compress images is to use an online WordPress image compression tool ie – ShortPixel image optimizer.
Today, while reading my ShortPixel review, you will know – How to optimize your website images up to 90% using ShortPixel?
Table of Contents
What is ShortPixel?
ShortPixel is the best image optimization and compression WordPress plugin.
It improves website performance by reducing the image size along with assuring you that no compromise is made with the image quality.
This WordPress optimize images tool offers –
- Image optimization and compression API
- WordPress Plugin is popularly known as – ShortPixel Adaptive Images & ShortPixel Image Optimizer.
How ShortPixel WordPress Image Compression Plugin Works?
ShortPixel is a SaaS product (Software as a service) which means all the operations performed on images are done by servers in the cloud.
In simple words, this image optimizer WordPress plugin works in 3 easy steps –
- Copies your website images to their servers via ShortPixel API.
- Performs compression on the images.
- Replaces your website images with optimized images.
While performing compression and optimization, ShortPixel keeps the original images in the backup folders.
So in case you want to use original images, you can always restore them.
ShortPixel vs Imagify vs WP Smush vs Optimole
It is time to know- How ShortPixel outranks other image optimizer & compressor tools like Imagify, WP Smush, and Optimole?
I am going to compare these WordPress image compression tools on the basis of 5 parameters – Free Plan, Free Image Optimizations (per month), Maximum File Size, Pricing, and Performance.
1. Free Plan
The good thing is all 4 services offer a free plan up to a certain image limit.
Verdict – Tie
2. Free Image Optimizations (per month)
- ShortPixel – 100 images/month
- Imagify – Approx 250 images/month
- Optimole – 1GB (approx 1000 images)
- WP Smush – Unlimited
Verdict – WP Smush
3. Maximum File Size
- ShortPixel – No limit
- Imagify – 2MB
- Optimole – No Limit
- WP Smush – 1MB
Verdict – ShortPixel and Optimole both are Winners.
4. Pricing (per month)
- ShortPixel – $4.99
- Imagify – $4.99
- Optimole – $9.99
- WP Smush – $49
Verdict – ShortPixel and Imagify both are winners.
5. Performance
- ShortPixel – Extraordinary
- Imagify – Good
- Optimole – Excellent
- WP Smush – Below Average
Verdict – ShortPixel is the Winner
Final Verdict – ShortPixel is the Winner!
ShortPixel outranks its competitors in every department.
It is not only cheap but also an easy-to-use and the best high-performance image optimizer tool 2022.
ShortPixel Features – How ShortPixel WordPress Plugin Helps You Optimize Your Images?
ShortPixel best online image compressor tool is powered by some awesome features.
Let’s go through them one by one –
1. Supported Image Formats
ShortPixel compresses PNG, JPG, GIF (even animated ones), and WebP.
Apart from the above image formats, it also optimizes PDF document files.
2. Multiple Compression Types
You can choose the level to compress your images by 3 compression types –
(a) Lossy
Lossy compression provides the best compression rate but also reduces the image quality slightly.
(b) Glossy
Glossy compression is a high-quality lossy technique that is specially designed for photographers and professionals.
(c) Lossless
Images optimized by lossless compression have the same image quality as originals, but with less image size.
It provides less compression rate compared to the above 2 techniques.
3. Automatic Image Optimization
The automatic image optimization feature is by default enabled since the installation, so no extra configuration is needed.
As the name suggests, it saves time by automatically optimizing images added to the post and pages.
It also optimizes images outside of the media library added by other WordPress plugins.
4. Automatic File Resizing
ShortPixel automatically resizes images before image optimization. In addition to this, you can also set a maximum file size to resize images.
5. No File Size Limit
One of the best things about ShortPixel is that there’s no file size limit.
So you can upload heavy and super high-quality images and optimize them.
6. Bulk Image Compression in Single Click
Optimize all the existing images in the Media Library or Gallery images with a single click.
7. Quality
ShortPixel plugin shrinks image size up to 90% without any drop in image quality.
Though, you might notice a slight difference in quality in the lossy compression, but not in lossless and Glossy compression.
8. Compatibility
ShortPixel WordPress image optimization plugin offers compatibility with a wide range of features and services.
It is compatible with –
- WP Retina 2x, hence automatically compresses all retina images.
- NextGEN Gallery.
- Foo Gallery.
- Other sliders, and image galleries.
- WooCommerce – works great for eCommerce websites.
- WP Engine hosted websites.
- All major web hosting providers.
- WPML & WPML media plugins.
- WP Offload S3
- WP Stateless
9. CDN Integration
As this image compression tool provides CDN integration! You can easily integrate Cloudflare with it.
10. Multi-Website & Multisite Support
You can use the ShortPixel image compressor plugin on multiple websites or on a multisite and that tool uses a single API Key.
11. Quick Backups & Restore Original Images
Backup and restores images with a single click, one-by-one, or in bulk.
You can also disable the backup option in case you don’t want to consume extra space and bandwidth on your server.
12. Optimization Report & Statistics
Check the report and statistics of all the image optimization as this WordPress image compression plugin generates 40 days optimization report.
13. Other Features
- Automatically converts PNG to JPG as PNG format generally takes less size compared to JPG format.
- Converts CMYK to RGB.
- Works flawlessly with both HTTPS and HTTP websites.
- Easy to setup
- Easy to use
- Simple User Interface
ShortPixel Plans & Pricing – How Much Does it Cost & Is it Worth It?
One of the best things about ShortPixel is that you can use all of the available features in their free plan.
The only difference between the free and premium plans are the number of images you can optimize with ShortPixel.
Let’s check out ShortPixel plans and pricing.
Free Plan
ShortPixel free plan lets you optimize 100 images/month.
You can use all the above features in the free plan as there is no restriction.
Paid Plans
ShortPixel paid plans are categorized as monthly and one-time plans.
1. Monthly Plans
Monthly plans start at $4.99 for 5000 images/month and went up to $29.99 for 55,000 images/month.
2. One-time Plans
One-time plans start from $9.99 for 10000 images and went up to $99 for 170,000 images.
How To Set Up ShortPixel On Your WordPress Site?
Now that you have known all the essential things about this amazing image optimizing tool and how it helps to improve website performance.
It’s time to set up ShortPixel on your WordPress website. It is a 2 step process –
1. Install and Activate the ShortPixel WordPress Plugin
To install ShortPixel WordPress Plugin, go to Dashboard > Plugins > Add New.
Search for ShortPixel in the plugins search bar.
Click on Install on ShortPixel Image Optimizer and activate the plugin.
2. Request your ShortPixel API key
Post activation, you will be redirected to the ShortPixel Dashboard where you will be asked to enter your email and request ShortPixel API Key.
Once you click on “Request Key”, you will be redirected to the ShortPixel website.
Accept the terms and conditions and click on the Sign-Up button.
Once you do that, it will show you your API Key which you can use on the same dashboard that appeared after installation.
It will verify the API key, if right, you will be redirected to the ShortPixel settings where you can configure settings before you start using the plugin.
How to Configure ShortPixel Settings?
Follow the below steps to configure the ShortPixel Settings –
1. Compression Type
Recommended compression type is lossy, but it’s not mandatory to opt for it every time. It completely depends on your requirements and choice.
Like if you are running a photography blog or travel blog where you need to put high-quality images, then you can also opt for glossy or lossless compression type.
2. Other Settings
Just below the compression type, you will find some other significant settings –
(a) Also, Include Thumbnails
Image thumbnails (such as featured images) are the images that are usually seen by most of the audience and generate a decent amount of traffic.
If you decide to optimize thumbnails, then you should enable this option. Note that thumbnail optimization counts up to your total quota.
Though I will recommend you enable this option.
(b) Image Backup
If you enable this setting, ShortPixel will keep a backup of the original unoptimized image along with the optimized version of the same image.
I will recommend you enable image backup settings.
(c) Remove EXIF
EXIF tag is the metadata associated with the image.
If you enable this option, ShortPixel will remove the EXIF metadata which will eventually reduce the image size.
(d) Resize large images
ShortPixel lets you set the maximum dimensions for your images.
The best thing about ShortPixel resizing is that it maintains the same aspect ratio and doesn’t crop images at all.
3. ShortPixel Advanced Settings
ShortPixel also offers some advanced settings which include –
- Convert PNG images to JPEG
- CMYK to RGB conversion
- WebP Images
- Optimize Retina Images
- Optimize PDFs
- Auto-optimization of images added by users in the front end.
- Exclusion of thumbnails of Particular sizes
4. Cloudflare API
If you use Cloudflare CDN on your website, then it is recommended that you should fill out some Cloudflare details under the Cloudflare API in the ShortPixel plugin settings.
All you need to do is to fill out the following details –
- Email Address (used in the Cloudflare account)
- Cloudflare API Key
- Zone ID
How To Compress WordPress Images With ShortPixel Plugin?
There are 3 ways to compress and optimize your images with ShortPixel in WordPress –
1. Automatic Image Optimization
After configuration, ShortPixel will automatically start image optimization of new website images that you upload to the media library.
2. Bulk Image Optimization
If you want to compress images in bulk, then follow the below steps –
1. Go to Media > Bulk ShortPixel.
2. Click on ‘Start Optimizing’ to start bulk image optimization.
3. Manual Optimization – One-by-one
You can also optimize the images manually instead of bulk image optimization.
1. Go to Media > Library.
2. Switch to List View from Grid View.
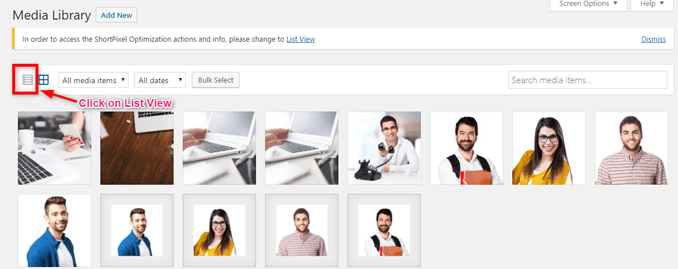
3. Click the ‘Optimize Now’ button in front of the image you want to optimize.
Final Thoughts On Using ShortPixel Image Optimizer
Website speed is a ranking signal in Google’s Algorithm now, and images play a crucial role in website speed.
Therefore image optimization is not an option anymore, it has become a necessity.
We have tried and tested multiple image compression and optimization WordPress plugins, online tools, and services.
ShortPixel is definitely one of the best image optimizers for WordPress websites.
You can automate, bulk optimize, and manually optimize your website images with ShortPixel.
Apart from that, it supports multiple image formats along with 3 compression types.
My recommendation is that you should definitely give it a try yourself for the first 100 images of your website as it is free.
I am sure after seeing the results you will purchase the paid plan of ShortPixel WordPress Plugin.