13+ Essential Settings To Do After WordPress Installation!
Everyone who finishes WordPress installation thinks what is the next step after it!! This is one hell of a question for every beginner or a newbie blogger.
Well, there are some important things you should do after installing WordPress to make sure – your website is ready to publish, secure and optimized for search engines.

Configuring and setting up the website properly is equally significant as WordPress installation.
You can do a bunch of things and make proper settings to make your new website secure, fast and optimized since the beginning.
What To Do After Installing WordPress?
Many users may or may not know all the essential WordPress settings to update after installing WordPress.
Well, today I’ve compiled a checklist of all those essential settings one must do after a fresh WordPress Installation.
Let’s start with the basic and moves towards advanced one –
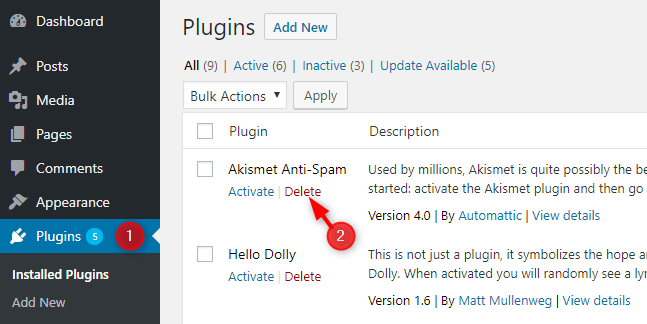
1. Delete Default Content
WordPress generates dummy content at the time of installation which includes –
- Dummy post (Hello World)
- Dummy Page (Sample Page)
- Dummy comment
- Dummy Plugin (Hello Dolly)
How to delete the Default Content in WordPress?
It’s very easy to delete them, just go through these steps –
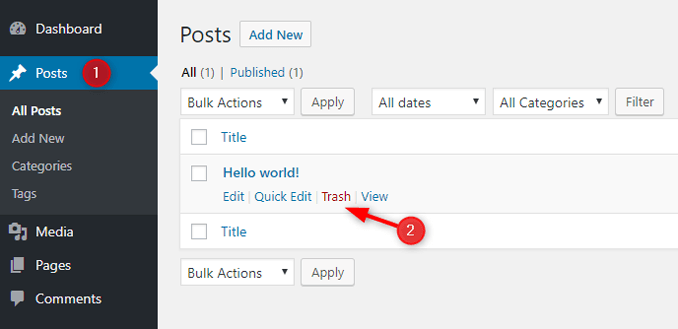
1. Go to your WordPress Dashboard.
2. Click on Posts > All Posts and click on Trash appearing just below the “Hello World” post.
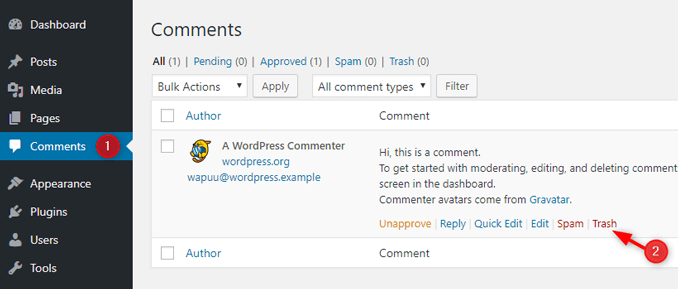
Note All the comments linked with the post you deleted will get removed. In this case, it doesn’t matter! But you should know this point.
3. If you wish to delete the comment manually, you can do that as well. Go to Comments and click on Trash appearing just below the default comment “A WordPress Commenter”.
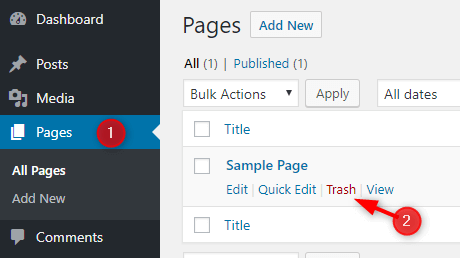
4. Similarly, go to Pages > All Pages and click on Trash appearing just below the “Sample Page”.
5. Go to Plugins > Installed Plugins and click delete appearing just below the “Hello Dolly” Plugin.
2. Change Site Title and Tagline
Changing the default WordPress “Site Title” & “Tagline” is very important.
As it gets displayed in Google Search when someone searches your website name on SERPs.
WordPress sets “Just another WordPress site” as the default tagline during installation.
How To Change Site Title & Tagline?
METHOD #1 – From General Settings
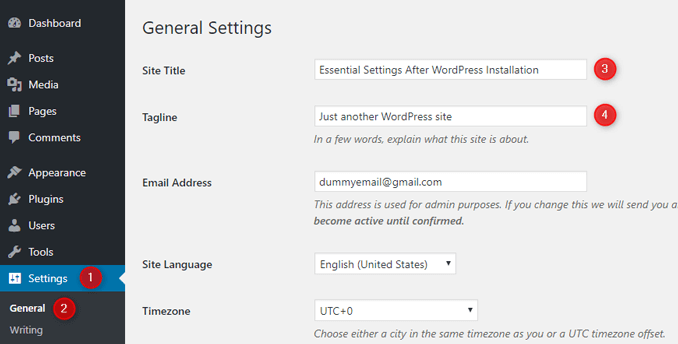
- Click on Settings > General Settings in your WordPress dashboard.
- Change the default title and tagline with the ones you want to display in Google for your website.
- Scroll Down and Click on Save Changes.
METHOD #2 – From Customizer
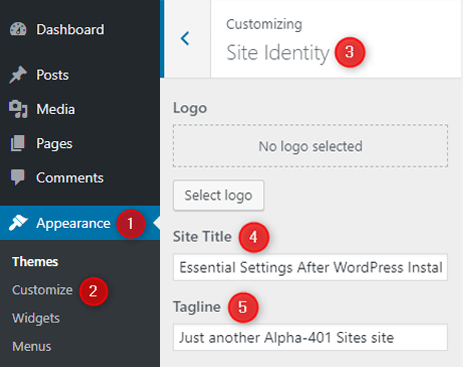
- You can also edit site title and tagline from the WordPress Customizer.
- Click on Appearance > Customize.
- Click on Blog Info and change the default site title and tagline with the ones you want to display in Google search results for your website.
- Scroll Down and Click on Save Changes.
3. Set Language Preferences
It is recommended to set the language preference if you are blogging in your native language and for native audience.
Language preference is first asked at the time of WordPress installation but you can change it again if you want to.
By setting the language preference, you are actually setting the “lang” attribute for your HTML document.
In simple words, you are specifying the natural language of the content of your WordPress website.
How To Change Language Preference In WordPress?
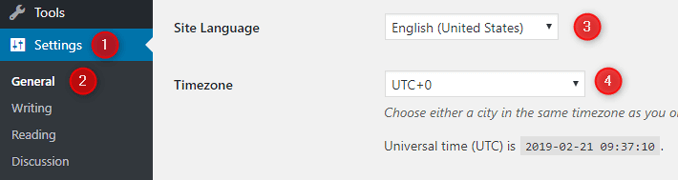
- Click on Settings > General Settings in your WordPress dashboard.
- Select your preferred language from the Site Language dropdown.
- Scroll Down and Click on Save Changes.
4. Set Your Timezone
Setting the timezone is a highly recommended setting.
Set your WordPress website’s timezone the same as your local time. Why so?
Because when you will schedule your posts, they will be published according to your time.
How To Set Timezone In WordPress?
- Click on Settings > General Settings in your WordPress dashboard.
- Select your preferred time from the Timezone dropdown.
- Scroll Down and Click on Save Changes.
Note You can set timezone either by selecting a city in the same timezone as you or a UTC timezone offset.
5. Setup WordPress Permalinks
Permalinks play a crucial role in SEO. Therefore it’s important to make sure your website has SEO friendly URLs.
The default WordPress permalink structure is – http://yourdomain.com/p=123 which is short but clearly not SEO friendly for search engines especially for Google.
How To Change Permalink Structure in WordPress?
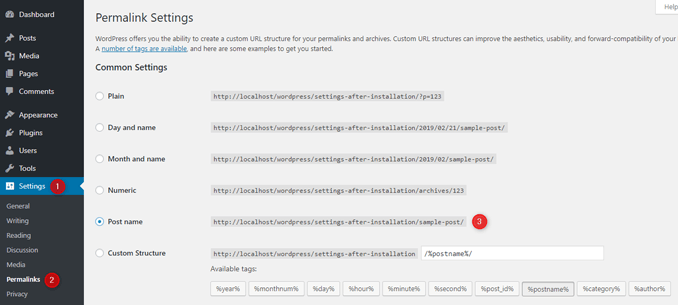
- Go to Settings > Permalink in your WordPress dashboard.
- Select “Post Name” from the Permalink Settings list – http://yourdomain.com/sample-post/
- Scroll Down and Click on Save Changes.
6. Set WordPress Address & Site Address
Setting WordPress and site address is crucial because your website visitors will access your website by typing these URLs.
But which version, WWW or non-WWW?
It really doesn’t matter whether you choose WWW version or non-WWW version for your website.
It won’t affect your website’s SEO. It’s completely up to you which one you choose for your website.
Generally, WordPress address and site address is same, but if you want your website’s homepage to have a different URL then you can do this by entering that URL into Site Address.
How To Set WordPress Address & Site Address in WordPress?
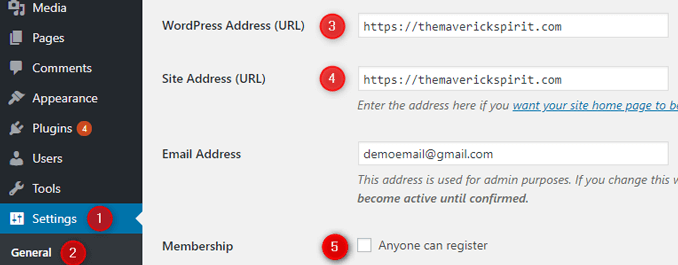
- Go to Settings > General in your WordPress dashboard.
- Enter WordPress Address (URL) & Site Address (URL) in their respective fields.
- Scroll Down and Click on Save Changes.
You will be automatically logged out the moment you click on Save Changes.
You will also notice your preference for your website’s domain name in the address bar. Now you can
7. Enable/Disable User Registration
This option depends on whether you are planning to have a multi-author blog or a single or limited author blog.
Multi-author blogs can be used when you allow guest posting on your website, but you might receive a lot of spam registrations in the process.
And if you’re going to handle your website alone or with your partner, then you should disable the user registration for your website.
How To Enable/Disable User Registration in WordPress?
- Go to Settings > General in your WordPress dashboard.
- Go to membership
- Uncheck the “Anyone can register” option under Membership Section.
- Check if you want to allow guest posting on your website.
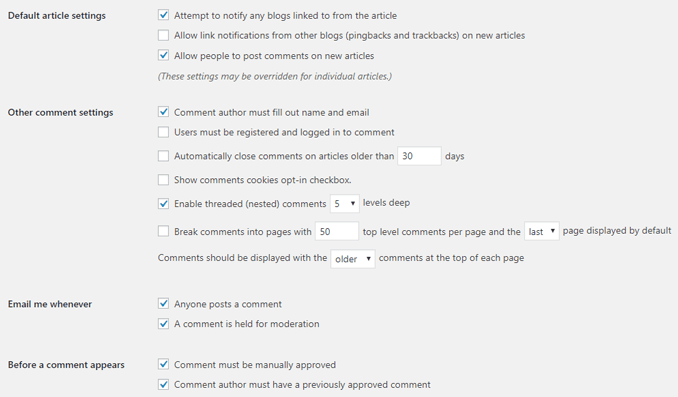
8. Set WordPress Discussion/Comments Settings
Comments plays a crucial role in your website as they reflects user engagement.
Hence it’s important to configure your Comments Settings properly.
How To Set WordPress Discussion/Comments Settings?
- Go to Settings > Discussion.
- It completely depends on you what settings are suitable for your website. Below is a screenshot of recommended settings by us.
9. Populate WordPress Ping List via Update Services
Before moving on to this setting, you might want to read about Pingbacks & Trackbacks.
Update Services are tools which let users know that you’ve updated or published a new piece of content on your blog.
WordPress automatically notifies popular Update Services about the update of the blog by sending an XML-RPC ping.
Update Services further process the ping and updates their proprietary indices with your blog update.
WordPress by default pings only one service – http://rpc.pingomatic.com/ But you can add more services to the WordPress ping list.
How To Add Ping List To WordPress Update Services?
- Go to Settings > Writing.
- Scroll down to Update Services section and add your ping list.
- Click on Save Changes and you’re done.
10. WordPress Media Settings
WordPress organize media uploads into month- and year-based folders.
By default, WordPress creates three other copies for thumbnail, medium and large image sizes mentioned in the media settings apart from saving the original image.
This not only increases the number of unnecessary files but also consumes more space on the server.
So if you don’t want this to happen, make sure you change all the size numbers to zero.
How To Set Media Sizes In WordPress?
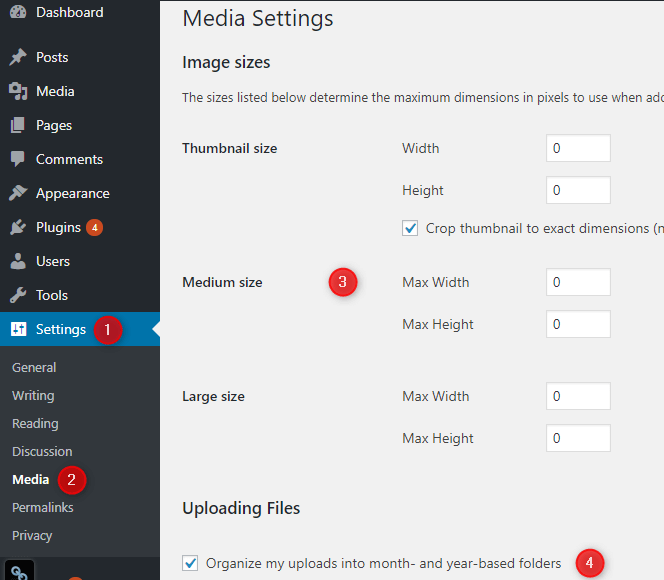
- Go to Settings > Media.
- Change the thumbnail, medium and large image width and height to zero. This will avoid the creation of unusual files.
- On the other hand, if you want to set image size according to your choice, you can set them as most WordPress themes comes with appropriate image sizes.
You can also check out our articles on How to optimize images in WordPress? and How to make your images SEO friendly by adding alt tags & title tags in WordPress?
11. Setup Primary User Profile
Before publishing articles and blog posts, set up your primary user profile.
Each WordPress theme comes with an author box on the single blog post and hence its important to add some info about yourself for your audience.
If you’ve multiple users, but limited in numbers, setup all of the user profiles to maintain authenticity.
This will let your audience know that the person writing the blog post is real and not a random or an anonymous person.
How To Setup Primary User Profile in WordPress?
- Go to Settings > Users > Your Profile.
- Fill up the below details
- First Name
- Last Name
- Email Address
- Website
- Social Profile Links
- Biographical Info
- Click on Update Profile after filling the above details. It will save your user profile.
12. Setup Gravatar
Next thing you need to do after setup the user profile is to set up a gravatar image for your user profile.
You can check out our article on How to set up a Gravatar Image in WordPress?
13. Disable Directory Browsing
Disabling Directory Browsing is one of the significant security measure one should definitely take in their website.
It blocks user access to WordPress folders. You can do this by adding a line to your Htaccess file.
Don’t forget to take a backup of your htaccess file before making any changes.
You can restore the original file in case of any error.
How To Disable Directory Browsing in WordPress?
- Open up your cPanel.
- Go to File Manager > public_html folder.
- Locate .htaccess in the public_html folder.
- Right click on the .htaccess file and click on edit.
- Paste “Options All -Indexes” either before <IfModule> or after </IfModule>.
- Click on “Save Changes” and close the file.
14. Disable/Limit Post Revisions
WordPress stores revisions of each drafted, published,
WordPress revision system allows you to restore a previous version in case of any problem with the original or current version of the post.
Keeping revisions is good but every revision take some space in the server. There’s no need of keeping multiple revisions for a single post, isn’t it?
Hence the best practice is either to disable post revisions completely or limit the post revisions.
You need to add the below code in the
But before that check out the article on How to edit wp-config.php in WordPress.
How To Disable Post Revisions in WordPress?
You just need to add the below code in your wp-config.php to disable the post revisions.
define ( ‘WP_POST_REVISIONS’ , false);How To Limit Post Revisions in WordPress?
You just need to add the below lines in your wp-config.php to limit the post revisions.
define( 'WP_POST_REVISIONS', 1); // only allow 1 post revisions
define( 'AUTOSAVE_INTERVAL', 120);  // set default save interval to 2 mins
Conclusion
By following the above mentioned important things or settings to do after WordPress installation! I can ensure that you had a solid start of your website.
Being a developer, I have followed them all.
In addition to this, if you think there are any other essential WordPress setting missed out or one must follow!
Drop them in the comments below so that I can have a look and add it up to the list if it has to be there. 🙂